环境配置

1
2
pip install opencv-python==xx.xx
pip insatll opencv-contrib-python==xx.xx

注意两个包的版本号要相同

读取图片

opencv读入的图片默认是RBG格式的,若要用matplotlib画图需要转成RGB格式

1
2
3
img = cv.imread(r'./img/2.jpg') # 读入图片
type(img)
# <class 'numpy.ndarray'>

一般来说,图片的存储形式为三维矩阵(宽 颜色通道数)

1
2
3
4
# 展示图片
cv2.imshow('image', img) # 窗口名字、图像矩阵
cv2.waitKey(0) # 等待自动关闭时间(ms级别),使用0代表手动关闭,按任意一个键关闭
cv2.destoryAllWindows() # 关闭窗口

封装一下展示图片的代码

1
2
3
4
def show_image(windows_name, image):
cv2.imshow(windows_name, image)
cv2.waitKey(0)
cv2.destroyAllWindows()

灰度图

读取灰度图

1
image2 = cv2.imread(r'./img/2.jpg', cv2.IMREAD_GRAYSCALE)

在图像读取中添加一个第二参数cv2.IMREAD_GRAYSCALE,代表读取该图像的灰度图

对比代码

1
2
3
4
5
6
image1 = cv2.imread(r'./img/2.jpg')
image2 = cv2.imread(r'./img/2.jpg', cv2.IMREAD_GRAYSCALE)
print(image1.shape)
print(image2.shape)
show_image('img1', image1)
show_image('img2', image2)

这个可以看到,输出的image1.shape=(w,h,3)image2.shape=(w,h)并且图片也从彩色图片变成黑白图片。

读取视频

视频实际上就是多张图片按照先后顺序依次展示的样子。

1
2
3
4
5
vc = cv2.VideoCapture(r'./img/1.mp4')  # 读取视频
if vc.isOpened(): # 检查是否可以打开
opened, frame = vc.read()
else:
opened = False

对于一个已经打开的视频,每一次读取都会读到一帧的静态图像 opened, frame = vc.read() (两个参数,一个是不是视频的有效帧、一个是图像帧)

视频展示

1
2
3
4
5
6
7
8
9
10
11
12
13
14
15
16
17
vc = cv2.VideoCapture(r'./img/1.mp4')
if vc.isOpened():
opened, frame = vc.read()
else:
opened = False

# 视频展示
while opened:
ret, frame = vc.read()
if frame is None:
break
if ret == True:
gray = cv2.cvtColor(frame, cv2.COLOR_BGR2GRAY) # 图像转化成灰度图
cv2.imshow('result',gray)
if cv2.waitKey(1) & 0xFF == 27: # 调整视频播放倍速
breakvc.release()
cv2.destroyAllWindows()

从上面可以看到,通常我们说的对于视频的处理,实际上是对于每一帧的图像进行处理。

图像的颜色通道

切分颜色通道

1
2
3
4
b, g, r = cv2.split(image) # (576, 1024, 3)
print(b.shape) # (576, 1024)
print(g.shape) # (576, 1024)
print(r.shape) # (576, 1024)

合并颜色通道

1
2
im = cv2.merge((b, g, r)) # (576, 1024)
print(im.shape) # (576, 1024, 3)

单通道提取

1
2
3
4
5
image = cv2.imread(r'./img/2.jpg')
cur_img = image.copy()
cur_img[:, :, 2] = 0
cur_img[:, :, 0] = 0
show_image('r', cur_img)

注意:(0,1,2)=== (b,g,r)这和一般我们的思想rgb不同

边界填充

cv2中一共有五种边界填充方式(replicate、reflect、reflect101、wrap、constant)

1
2
3
4
5
6
7
8
9
10
11
top, right, left, bottom = (50, 50, 50, 50)

replicate = cv2.copyMakeBorder(img, top, bottom, left, right,
borderType=cv2.BORDER_REPLICATE)
reflect = cv2.copyMakeBorder(img, top, bottom, left, right,
borderType=cv2.BORDER_REFLECT)
reflect101 = cv2.copyMakeBorder(img, top, bottom, left, right,
borderType=cv2.BORDER_REFLECT_101)
wrap = cv2.copyMakeBorder(img, top, bottom, left, right, borderType=cv2.BORDER_WRAP)
constant = cv2.copyMakeBorder(img, top, bottom, left, right,
borderType=cv2.BORDER_CONSTANT, value=10)
  • BORDER_REPLICATE : 复制法,复制最边缘的像素点进行填充
  • BORDER_REFLECT:反射法,对感兴趣的图像中的像素在两边进行复制例如:fedcba|abcdefgh|hgfedcb
  • BORDER_REFLECT_101:以最边缘的像素为轴做对称如:hgfedcb|abcdefgh|gfedcba
  • BORDER_WRAP:外包装法,如:cdefgh|abcdefgh|abcdefg
  • BORDER_CONSTANT:常量填充

数值计算

  • 直接在读出的图像矩阵加常数,对数据图像矩阵的所有值都进行加上这个常数
1
2
img1 = cv2.imread(r'./img/2.jpg')
img2 = img1 + 10
  • 将两图像(规格相同)直接相加(用+号相加),对应数值相加并且若和 s>255s=s%256
1
2
img3 = img1 + img2
# img1.shape = img2.shape = (576, 1024, 3)
  • 利用cv2.add()对两个图像相加,对应数值相加,若 s>255s=255
1
img4 = cv2.add(img1, img2)

图像融合

注意对于融合的图像大小规格要相同才可以进行融合,对于不同大小的图片进行融合我们需要利用cv2.resize() 来调整图片大小

1
2
3
4
img1 = cv2.imread(r'./img/2.jpg') # (576,1024,3)
img2 = cv2.imread(r'./img/2-1.png')

img2 = cv2.resize(img2, (1024, 576)) # 注意参数的位置

cv2.resize() 的用法

1
2
3
4
5
6
7
show_image('0', img1)
res = cv2.resize(img1, (0, 0), fx=2, fy=1) # x轴方向伸展2倍
show_image('1', res)
res = cv2.resize(img1, (0, 0), fx=1, fy=2) # y轴方向伸展2倍
show_image('2', res)
res = cv2.resize(img1, (0, 0), fx=1.5, fy=1.5) # x、y轴同时伸展1.5倍
show_image('3', res)

图像融合可以看成公式

1
res = cv2.addWeighted(img1, 0.4, img2, 0.6, 0)

cv2.addWeighted(x1, α, x2, β, b) 对应的参数

阈值处理

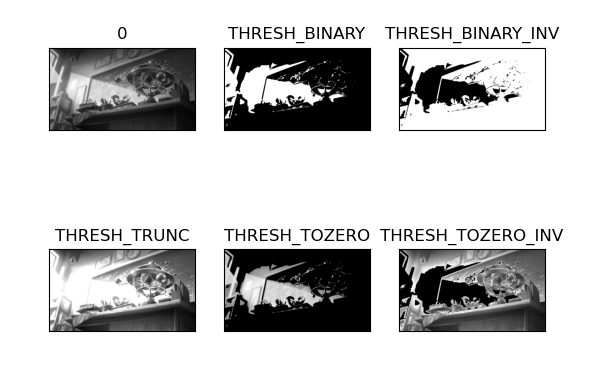
二值化处理函数ret,dst=cv2.threshold(src,thresh,maxval,type) 对应的参数解释如下:

  • src: 输入图,只能输入单通道图像,通常是灰度图
  • dst: 输出图
  • thresh: 阈值,返回值中的ret就是该值
  • maxval: 当像素超出阈值(或者是小于阈值,根据type决定)所赋予的值
  • type: 二值化操作类型,包含5种类型:
    • cv2.THRESH_BINARY 超过阈值部分取 maxval (最大值),否则取0
    • cv2.THRESH_BINARY_INV cv2.THRESH_BINARY的反转
    • cv2.THRESH_TRUNC 大于阈值的部分设为阈值,否则不变
    • cv2.THRESH_TOZERO 大于阈值的部分不变,否则设为0
    • cv2.THRESH_TOZERO_INV cv2.THRESH_TOZERO 的反转
1
2
3
4
5
6
7
8
9
10
11
12
13
14
ret, thresh1 = cv2.threshold(img, 127, 255, cv2.THRESH_BINARY)
ret, thresh2 = cv2.threshold(img, 127, 255, cv2.THRESH_BINARY_INV)
ret, thresh3 = cv2.threshold(img, 127, 255, cv2.THRESH_TRUNC)
ret, thresh4 = cv2.threshold(img, 127, 255, cv2.THRESH_TOZERO)
ret, thresh5 = cv2.threshold(img, 127, 255, cv2.THRESH_TOZERO_INV)
images = [img, thresh1, thresh2, thresh3, thresh4, thresh5]
names = ["0", "THRESH_BINARY", "THRESH_BINARY_INV", "THRESH_TRUNC", "THRESH_TOZERO", "THRESH_TOZERO_INV"]
for i in range(6):
plt.subplot(2, 3, i + 1)
plt.imshow(images[i], "gray")
plt.title(names[i])
plt.xticks([])
plt.yticks([])
plt.show()

输出的图像对比图

二值化模式对比图